


<p><a href="https://gamerode.com/tag/sekiro-shadows-die-twice/">Sekiro: Shadows Die Twice</a>, developed by <a href="https://gamerode.com/tag/fromsoftware/">FromSoftware</a>, is renowned for its immense difficulty. Unlike other games from the studio, Sekiro does not feature traditional RPG elements such as leveling up and experience farming. Instead, it focuses on intense and rapid sword combat.</p>


<p>In Sekiro, you will encounter a variety of distinctive bosses that stand between you and triumph. We are here to provide you with strategies on how to overcome each challenge and emerge as the ultimate shinobi.</p>


<p>Continue reading for a comprehensive guide on all the bosses, their order, and some helpful tips on how to defeat them.</p>


<p><strong>You Might Also Like:</strong></p>


<ul class="wp-block-list">
<li><a href="https://gamerode.com/tips/best-games-wizards-mages/">Games With Wizards And Mages</a></li>


<li><a href="https://gamerode.com/tips/games-created-genres/">Games That Started New Genres</a></li>


<li><a href="https://gamerode.com/tips/video-games-define-their-genres/">Games That Define Their Genres</a></li>
</ul>


<hr class="wp-block-separator has-alpha-channel-opacity"/>


<h2 class="wp-block-heading" id="h-all-sekiro-shadows-die-twice-bosses-in-order">All Sekiro: Shadows Die Twice bosses in order</h2>


<h3 class="wp-block-heading" id="h-gyoubu-oniwa">Gyoubu Oniwa</h3>


<figure class="wp-block-gallery has-nested-images columns-default is-cropped wp-block-gallery-1 is-layout-flex wp-block-gallery-is-layout-flex">
<figure class="wp-block-image size-large"><img data-id="8149" src="http://gamerode.com/wp-content/uploads/2024/06/All-Sekiro-Shadows-Die-Twice-bosses-in-order-Gyoubu-Oniwa-1024x543.webp" alt="All Sekiro Shadows Die Twice Bosses In Order Gyoubu Oniwa" class="wp-image-8149"/></figure>
</figure>


<p>The initial boss encounter in Sekiro provides players with an excellent opportunity to practice and improve their Deflection abilities while also inflicting significant Posture damage. Although Gyoubu Oniwa is known for their high mobility and aggressive nature, it is still possible to deflect their attacks by employing precise timing, skill, and a patient approach.</p>


<p>If you&#8217;re not successful with other strategies, you can try using grappling hook attacks to deal some damage to this boss. This can be a good option if you want to maintain a safe distance from this terrifying boss who is mounted.</p>


<h3 class="wp-block-heading" id="h-emma-isshin-ashina">Emma/Isshin Ashina</h3>


<figure class="wp-block-gallery has-nested-images columns-default is-cropped wp-block-gallery-2 is-layout-flex wp-block-gallery-is-layout-flex">
<figure class="wp-block-image size-large"><img data-id="8148" src="http://gamerode.com/wp-content/uploads/2024/06/All-Sekiro-Shadows-Die-Twice-bosses-in-order-Isshin-Ashina-1024x576.jpg" alt="All Sekiro Shadows Die Twice Bosses In Order Isshin Ashina" class="wp-image-8148"/></figure>
</figure>


<p>If you decide to follow Owl&#8217;s orders and opt for the Shura ending in Sekiro, you will face the ultimate boss battle. </p>


<p>The initial stage of the fight involves challenging Emma, a formidable opponent who lacks a Gentle Blade but can easily defeat you if you become complacent. </p>


<p>The second phase introduces Isshin Ashina, the former ruler of Ashina and an expert in fire-based techniques.</p>


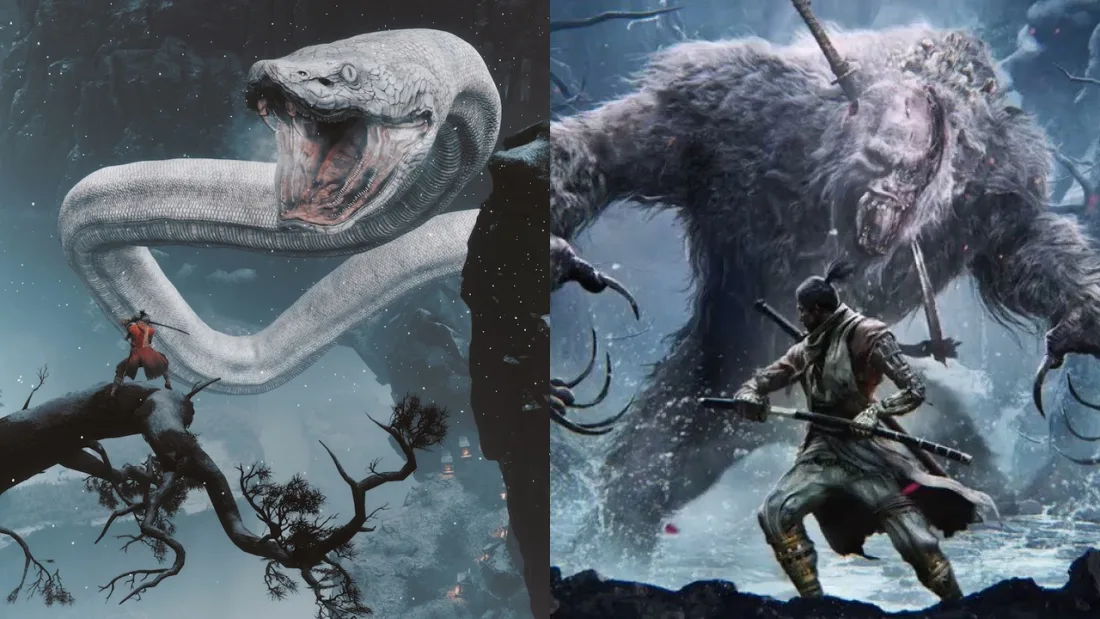
<h3 class="wp-block-heading" id="h-guardian-ape">Guardian Ape</h3>


<figure class="wp-block-gallery has-nested-images columns-default is-cropped wp-block-gallery-3 is-layout-flex wp-block-gallery-is-layout-flex">
<figure class="wp-block-image size-large"><img data-id="8147" src="http://gamerode.com/wp-content/uploads/2024/06/All-Sekiro-Shadows-Die-Twice-bosses-in-order-Guardian-Ape-1024x576.jpg" alt="All Sekiro Shadows Die Twice Bosses In Order Guardian Ape" class="wp-image-8147"/></figure>
</figure>


<p>When facing the Guardian Ape in Sekiro, it is crucial to stay constantly active and strategically counter and attack whenever you have the opportunity. </p>


<p>It is important to note that there is no safe spot during this battle, as the Ape is capable of releasing a powerful and destructive gas attack even if you manage to position yourself behind it.</p>


<h3 class="wp-block-heading" id="h-headless-ape">Headless Ape</h3>


<figure class="wp-block-gallery has-nested-images columns-default is-cropped wp-block-gallery-4 is-layout-flex wp-block-gallery-is-layout-flex">
<figure class="wp-block-image size-large"><img data-id="8146" src="http://gamerode.com/wp-content/uploads/2024/06/All-Sekiro-Shadows-Die-Twice-bosses-in-order-Headless-Ape-1024x576.webp" alt="All Sekiro Shadows Die Twice Bosses In Order Headless Ape" class="wp-image-8146"/></figure>
</figure>


<p>This particular boss in Sekiro becomes accessible after defeating the Guardian Ape. It is essentially a continuation of the previous battle, but with the added challenge of facing two apes. The second ape joins the fight once enough damage has been inflicted. </p>


<p>The initial phase of the battle is similar to the second phase of the Guardian Ape fight, while the second phase remains largely the same, but with the additional difficulty of dealing with two apes simultaneously.</p>


<h3 class="wp-block-heading" id="h-lady-butterfly">Lady Butterfly</h3>


<figure class="wp-block-gallery has-nested-images columns-default is-cropped wp-block-gallery-5 is-layout-flex wp-block-gallery-is-layout-flex">
<figure class="wp-block-image size-large"><img data-id="8145" src="http://gamerode.com/wp-content/uploads/2024/06/All-Sekiro-Shadows-Die-Twice-bosses-in-order-Lady-Butterfly-1024x599.webp" alt="All Sekiro Shadows Die Twice Bosses In Order Lady Butterfly" class="wp-image-8145"/></figure>
</figure>


<p>Lady Butterfly is one of the challenging bosses in the game Sekiro. Defeating her requires a strategic approach that emphasizes aggressive playstyle. </p>


<p>It is crucial to stay in close proximity to her, deflect her attacks after every three strikes, and prevent her from regaining her composure.</p>


<p>By maintaining relentless pressure and not giving her any breathing room, you will eventually emerge victorious against this formidable boss.</p>


<h3 class="wp-block-heading" id="h-genichiro-ashina">Genichiro Ashina</h3>


<figure class="wp-block-gallery has-nested-images columns-default is-cropped wp-block-gallery-6 is-layout-flex wp-block-gallery-is-layout-flex">
<figure class="wp-block-image size-large"><img data-id="8144" src="http://gamerode.com/wp-content/uploads/2024/06/All-Sekiro-Shadows-Die-Twice-bosses-in-order-Genichiro-Ashina.jpg" alt="All Sekiro Shadows Die Twice Bosses In Order Genichiro Ashina" class="wp-image-8144"/></figure>
</figure>


<p>If you want to defeat the Genichiro Ashina boss in Sekiro, we highly recommend unlocking the Mikiri Counter skill. </p>


<p>This particular boss heavily relies on low thrust attacks and frequently shoots arrows at you. By mastering the art of deflecting both the thrust attacks and arrows, you will increase your chances of emerging victorious in this battle.</p>


<h3 class="wp-block-heading" id="h-folding-screen-monkeys">Folding Screen Monkeys</h3>


<figure class="wp-block-gallery has-nested-images columns-default is-cropped wp-block-gallery-7 is-layout-flex wp-block-gallery-is-layout-flex">
<figure class="wp-block-image size-large"><img data-id="8143" src="http://gamerode.com/wp-content/uploads/2024/06/All-Sekiro-Shadows-Die-Twice-bosses-in-order-Folding-Screen-Monkeys-1024x576.webp" alt="All Sekiro Shadows Die Twice Bosses In Order Folding Screen Monkeys" class="wp-image-8143"/></figure>
</figure>


<p>In the boss battle of Sekiro, there are multiple monkeys, each with its own unique trait or weakness. To defeat them, you must analyze their individual gimmicks and devise strategies accordingly. </p>


<p>For instance, the See No Evil monkey has excellent eyesight but lacks in hearing abilities. On the other hand, the Speak No Evil monkey may have poor eyesight, but it possesses remarkable hearing skills. </p>


<p>Similarly, the Hear No Evil monkey excels in hearing, while the Do No Evil monkey can be traced through its glowing footprints. By approaching the fight with patience, systematically eliminating each monkey, you can emerge victorious in a short span of time.</p>


<h3 class="wp-block-heading" id="h-corrupted-monk">Corrupted Monk</h3>


<figure class="wp-block-gallery has-nested-images columns-default is-cropped wp-block-gallery-8 is-layout-flex wp-block-gallery-is-layout-flex">
<figure class="wp-block-image size-large"><img data-id="8142" src="http://gamerode.com/wp-content/uploads/2024/06/All-Sekiro-Shadows-Die-Twice-bosses-in-order-Corrupted-Monk-1024x512.avif" alt="All Sekiro Shadows Die Twice Bosses In Order Corrupted Monk" class="wp-image-8142"/></figure>
</figure>


<p>The Corrupted Monk boss in Sekiro challenges players to rely on their ability to memorize attack patterns. </p>


<p>By observing the boss&#8217;s consistent attacking style, players can time their moves correctly and utilize the Mikiri Counter to effectively bypass the boss&#8217;s defenses and deliver significant damage.</p>


<h3 class="wp-block-heading" id="h-great-shinobi-owl">Great Shinobi Owl</h3>


<figure class="wp-block-gallery has-nested-images columns-default is-cropped wp-block-gallery-9 is-layout-flex wp-block-gallery-is-layout-flex">
<figure class="wp-block-image size-large"><img data-id="8141" src="http://gamerode.com/wp-content/uploads/2024/06/All-Sekiro-Shadows-Die-Twice-bosses-in-order-Great-Shinobi-Owl.jpeg" alt="All Sekiro Shadows Die Twice Bosses In Order Great Shinobi Owl" class="wp-image-8141"/></figure>
</figure>


<p>When facing this particular boss in Sekiro, it is crucial to pay attention to the shurikens they throw in your direction. It is important to dodge these projectiles to avoid taking damage. </p>


<p>Additionally, this boss has the ability to drop an item that prevents healing, making it harder for you to recover during the fight. In its second phase, the boss will also utilize smoke bombs, which you must quickly move away from to avoid their effects. </p>


<p>Apart from these challenges, the key to defeating this boss lies in deflection. Try to deflect their attacks whenever possible, and if an attack cannot be deflected, make sure to dodge it.</p>


<h3 class="wp-block-heading" id="h-true-corrupted-monk">True Corrupted Monk</h3>


<figure class="wp-block-gallery has-nested-images columns-default is-cropped wp-block-gallery-10 is-layout-flex wp-block-gallery-is-layout-flex">
<figure class="wp-block-image size-large"><img data-id="8140" src="http://gamerode.com/wp-content/uploads/2024/06/All-Sekiro-Shadows-Die-Twice-bosses-in-order-True-Corrupted-Monk-1024x576.jpg" alt="All Sekiro Shadows Die Twice Bosses In Order True Corrupted Monk" class="wp-image-8140"/></figure>
</figure>


<p>The True Corrupted Monk encounter in Sekiro is a variation of the previous Corrupted Monk boss battle. However, this time, the boss can have three health bars based on the decisions you make in the game. </p>


<p>Although the fight is longer, the advantage is that the arena is larger, providing more space for maneuvering and making the combat more manageable compared to the initial encounter with this boss in Sekiro.</p>


<h3 class="wp-block-heading" id="h-divine-dragon">Divine Dragon</h3>


<figure class="wp-block-gallery has-nested-images columns-default is-cropped wp-block-gallery-11 is-layout-flex wp-block-gallery-is-layout-flex">
<figure class="wp-block-image size-large"><img data-id="8139" src="http://gamerode.com/wp-content/uploads/2024/06/All-Sekiro-Shadows-Die-Twice-bosses-in-order-Divine-Dragon-1024x576.jpg" alt="All Sekiro Shadows Die Twice Bosses In Order Divine Dragon" class="wp-image-8139"/></figure>
</figure>


<p>Although this boss may seem extremely intimidating at first, it is actually not as complicated as it seems. </p>


<p>In the first phase, you will need to defend yourself against a group of elderly dragons until a tree emerges, giving you the opportunity to latch onto it and attack the Divine Dragon. </p>


<p>In the second phase, you will need to either deflect or dodge incoming attacks while waiting for more trees to appear, enabling you to strike at the boss once more.</p>


<h3 class="wp-block-heading" id="h-owl-father">Owl (Father)</h3>


<figure class="wp-block-gallery has-nested-images columns-default is-cropped wp-block-gallery-12 is-layout-flex wp-block-gallery-is-layout-flex">
<figure class="wp-block-image size-large"><img data-id="8138" src="http://gamerode.com/wp-content/uploads/2024/06/All-Sekiro-Shadows-Die-Twice-bosses-in-order-Owl.jpg" alt="All Sekiro Shadows Die Twice Bosses In Order Owl" class="wp-image-8138"/></figure>
</figure>


<p>Prepare yourself for a challenging battle against this formidable boss in Sekiro. Just like you, this boss possesses a wide range of abilities, making it a formidable opponent. However, there is still hope. </p>


<p>Utilize the Mortal Draw skill to inflict significant damage on its Vitality and rely on the Whirlwind Slash to deliver quick bursts of attack. Nonetheless, be prepared for a tough fight. Employ deflections, evasions, and any available tools to outlast the boss and seize the opportunity to strike back.</p>


<h3 class="wp-block-heading" id="h-demon-of-hatred">Demon of Hatred</h3>


<figure class="wp-block-gallery has-nested-images columns-default is-cropped wp-block-gallery-13 is-layout-flex wp-block-gallery-is-layout-flex">
<figure class="wp-block-image size-large"><img data-id="8137" src="http://gamerode.com/wp-content/uploads/2024/06/All-Sekiro-Shadows-Die-Twice-bosses-in-order-Demon-of-Hatred-1024x569.webp" alt="All Sekiro Shadows Die Twice Bosses In Order Demon Of Hatred" class="wp-image-8137"/></figure>
</figure>


<p>The Demon of Hatred in Sekiro is not only one of the biggest bosses, but also one of the most challenging fights in the game. This battle will put all your skills to the test as it requires you to use everything you&#8217;ve learned so far. </p>


<p>The boss has a variety of unblockable attacks, so be prepared to run away, dodge, and then resume deflecting when the opportunity arises. It is advisable to have a good supply of healing and burn-related items to aid you in this tough battle.</p>


<h3 class="wp-block-heading" id="h-isshin-the-sword-saint">Isshin, The Sword Saint</h3>


<figure class="wp-block-gallery has-nested-images columns-default is-cropped wp-block-gallery-14 is-layout-flex wp-block-gallery-is-layout-flex">
<figure class="wp-block-image size-large"><img data-id="8136" src="http://gamerode.com/wp-content/uploads/2024/06/All-Sekiro-Shadows-Die-Twice-bosses-in-order-Isshin-The-Sword-Saint-1024x576.jpg" alt="All Sekiro Shadows Die Twice Bosses In Order Isshin The Sword Saint" class="wp-image-8136"/></figure>
</figure>


<p>In order to defeat Isshin, the final boss in Sekiro, you must master the art of deflection. It is crucial to memorize his attack patterns in each phase and stay close to him to effectively dodge and counter his strikes.</p>


<p>However, be cautious not to overextend, as Isshin will retaliate with a powerful gun attack. This battle is incredibly challenging, but once you emerge victorious, you can proudly proclaim yourself a true Sekiro Master.</p>


<p>Here is a comprehensive list of all the main bosses you will come across in Sekiro, arranged in the order of their appearance. By being aware of these bosses ahead of time, you can better prepare yourself and navigate through the game more smoothly.</p>


<p>For more content on ;<strong>List ;</strong>check out the relevant links below and any of our guides, list of games, and news on ;<a href="https://gamerode.com/">Gamerode</a>.</p>

All Sekiro: Shadows Die Twice bosses in order
Sekiro Shadows Die Twice