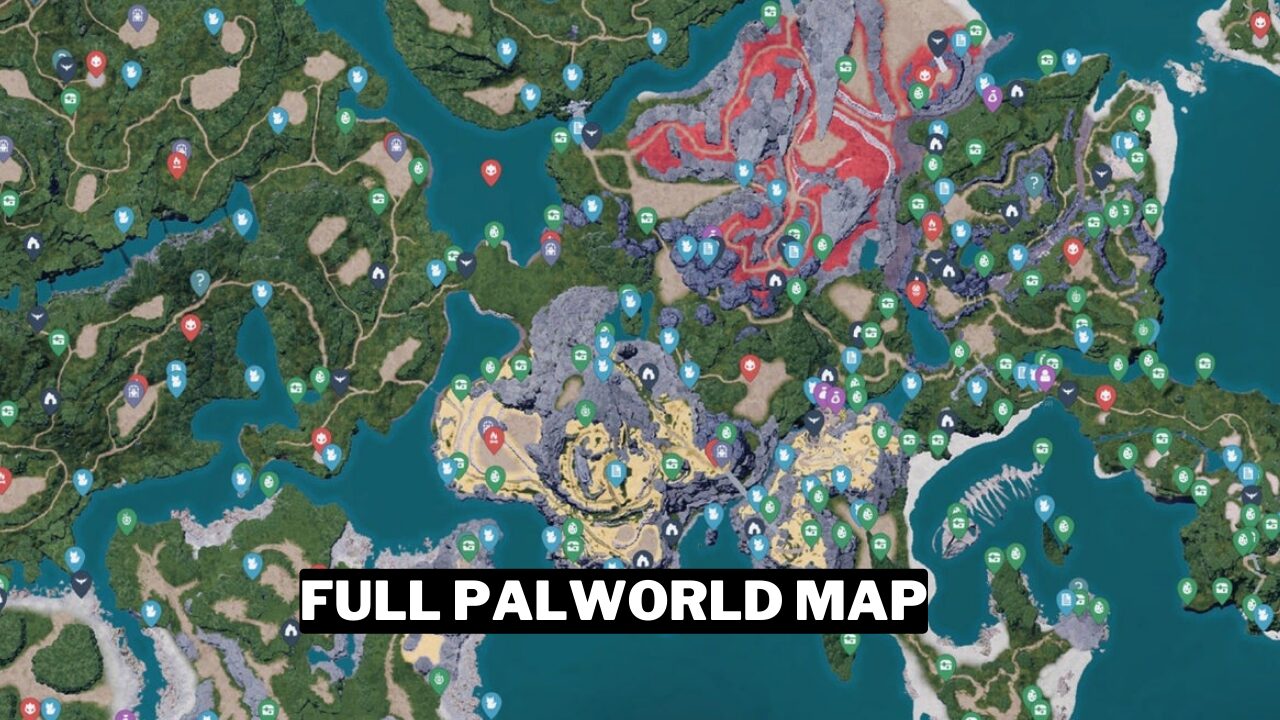
<p>The game <a href="https://gamerode.com/tag/palworld/">Palworld</a> offers players a large and expansive map that is filled with various areas and environments. These different locations not only provide a different gameplay experience, but also feature unique <a href="https://gamerode.com/tag/pals/">Pals</a>, challenges, and hidden surprises that can be discovered as you explore the world.</p>


<p>According to Pocketpair, the size of the Palworld map is estimated to be around 16 square kilometers. To help you navigate through the game, here are the various locations within the <strong>Palworld Map</strong>.</p>


<p><strong>Read More</strong></p>


<ul class="wp-block-list">
<li><a href="https://gamerode.com/guide/pure-quartz-palworld">Palworld Pure Quartz</a></li>


<li><a href="https://gamerode.com/guide/how-to-get-coal-palworld">Palworld Coal</a></li>


<li><a href="https://gamerode.com/guide/how-to-get-ore-palworld">Palworld Ore</a></li>


<li><a href="https://gamerode.com/guide/huge-dragon-eggs-palworld">Palworld Huge Dragon Egg</a></li>


<li><a href="https://gamerode.com/guide/how-to-get-sulfur-palworld">Palworld Surfur</a></li>
</ul>


<hr class="wp-block-separator has-alpha-channel-opacity"/>


<h2 class="wp-block-heading" id="h-all-palworld-map-region-locations">All Palworld map region locations</h2>


<figure class="wp-block-gallery has-nested-images columns-default is-cropped wp-block-gallery-1 is-layout-flex wp-block-gallery-is-layout-flex">
<figure class="wp-block-image size-large"><img data-id="4760" src="http://gamerode.com/wp-content/uploads/2024/02/Palworld-Map-All-regions-locations-and-points-of-interest-Regions-1024x576.webp" alt="Palworld Map All Regions Locations And Points Of Interest Regions" class="wp-image-4760"/><figcaption class="wp-element-caption">Image: Google</figcaption></figure>
</figure>


<p>The Palworld Map is divided into four main biomes, each with its own unique characteristics and variations.</p>


<ul class="wp-block-list">
<li><strong>Volcano</strong>
<ul class="wp-block-list">
<li>Situated in the southwestern region, the Palworld Map features a scorching realm characterized by its unforgiving landscapes and a diverse range of Fire-type Pals. In order to navigate and withstand the extreme heat, it is crucial to equip yourself with high-temperature resistant gear. Additionally, capturing the powerful Pals in this fiery domain requires the utilization of advanced Pal Spheres and formidable Pal companions.</li>
</ul>
</li>


<li><strong>Desert</strong>
<ul class="wp-block-list">
<li>The arid region in the northeast is known for being a sanctuary for Ground and Fire Pals. It shares similarities with the Volcano biome, and traveling through the blistering sands requires having heat-resistant equipment. The Pals residing in this area should not be taken lightly, so it is crucial to have a well-prepared and powerful party, along with an ample supply of food, before setting off on this adventure.</li>
</ul>
</li>


<li><strong>Snow</strong>
<ul class="wp-block-list">
<li>Located at the utmost northern region, the Palworld Map showcases a vast icy terrain inhabited by Water and Ice Pals. To navigate through this frozen landscape, it is essential to equip oneself with cold-resistant armor. Due to the formidable adversaries present in this area, some even reaching mid-40s in level, it is advisable to explore this region towards the end of your journey.</li>
</ul>
</li>


<li><strong>Forest</strong> 
<ul class="wp-block-list">
<li>Start your journey at the Plateau of Beginnings located in the lower right corner of the Palworld Map. This area provides convenient access to the central region of the Palpagos Islands and offers abundant resources. The Plateau is a collection of smaller islands that showcase glimpses of different biomes found throughout the map, giving you a taste of the adventures that await beyond.</li>
</ul>
</li>
</ul>


<p>In addition to the volcano and snow biomes, the Palworld map is filled with a combination of forests, mountains, and expansive bodies of water. As you explore the map, you may come across marshes and secret sanctuaries that hide extraordinary Pals waiting to be discovered. </p>


<p>However, it is crucial to be vigilant and look out for the Towers scattered across the map. These Towers serve as strongholds for the bosses who symbolize the different factions within Palworld.</p>


<hr class="wp-block-separator has-alpha-channel-opacity"/>


<h2 class="wp-block-heading" id="h-all-palworld-alpha-pal-boss-locations">All Palworld Alpha Pal Boss locations</h2>


<figure class="wp-block-gallery has-nested-images columns-default is-cropped wp-block-gallery-2 is-layout-flex wp-block-gallery-is-layout-flex">
<figure class="wp-block-image size-large"><img data-id="4761" src="http://gamerode.com/wp-content/uploads/2024/02/Palworld-Map-All-regions-locations-and-points-of-interest-Alpha-Boss-1024x654.jpg" alt="Palworld Map All Regions, Locations, And Points Of Interest Alpha Boss" class="wp-image-4761"/><figcaption class="wp-element-caption">Image: PCGamesN</figcaption></figure>
</figure>


<p>In Palworld, you may encounter a different kind of boss called Alpha Pals. These are special versions of regular Pals that have superior health and stats, and they are generally larger than the normal ones. While they may not be as formidable as tower bosses, they still pose a challenge at their respective levels. </p>


<p>So, it&#8217;s important not to underestimate them when trying to defeat them. You have the opportunity to capture Alpha Boss pals just like any other Pal, but only if you have weakened them sufficiently and are equipped with the best Pal Spheres available at their level. </p>


<p>These pals are highly regarded for their combat skills and their ability to assist with tasks at your Palworld base. Additionally, they can be used for breeding and obtaining Fusion Pals. It is advisable to make an effort to capture every Pal you encounter due to these advantages.</p>


<p>The Palworld map features a total of 43 Alpha Pal bosses scattered throughout. The table below includes the names, levels, types, and spawn area coordinates of these bosses. The list is organized from the lowest to the highest level, allowing you to decide which ones to pursue and which ones to avoid based on your current level.</p>


<figure class="wp-block-table"><table><thead><tr><th>Tower Boss</th><th>Level</th><th>Type</th><th>Location</th></tr></thead><tbody><tr><td>Chillet</td><td>11</td><td>Ice (weak to Fire)</td><td>(173, -417) on a plateau accessible from a nearby bridge.</td></tr><tr><td>Gumoss</td><td>11</td><td>Ground (weak to Grass)</td><td>(-113, -629) in a wide open area near a coastline.</td></tr><tr><td>Sweepa</td><td>11</td><td>Ice (weak to Fire)</td><td>(-227, -595) in a flat spot near a forested plateau.</td></tr><tr><td>Dumud</td><td>14</td><td>Ground (weak to Grass)</td><td>(-309, 2) close to the island&#8217;s centermost pond.</td></tr><tr><td>Penking</td><td>15</td><td>Water/Ice (weak to Electric)</td><td>(114, -354) within a dungeon in an autumnal zone.</td></tr><tr><td>Grintale</td><td>17</td><td>Neutral (weak to Dark)</td><td>(355, -247) in a massive open field near some small forests.</td></tr><tr><td>Azurobe</td><td>17</td><td>Water/Dragon (weak to Electric and Ice)</td><td>(-51, -387) in the middle of a large body of water.</td></tr><tr><td>Nitewing</td><td>18</td><td>Neutral (weak to Dark)</td><td>(-275, -71) flying over a sandy beach.</td></tr><tr><td>Kingpaca</td><td>23</td><td>Neutral (weak to Dark)</td><td>(50, -461) in an open sandy area surrounded by trees.</td></tr><tr><td>Katress</td><td>23</td><td>Dark (weak to Dragon)</td><td>(242, -333) in a dungeon on a small island.</td></tr><tr><td>Broncherry</td><td>23</td><td>Grass (weak to Fire)</td><td>(-222, -670) in a grassy field at the base of some small mountains.</td></tr><tr><td>Bushi</td><td>23</td><td>Fire (weak to Water)</td><td>(-117, -491) in a dungeon on a cliff.</td></tr><tr><td>Quivern</td><td>23</td><td>Dragon (weak to Ice)</td><td>(-255, -132) in a dungeon located next to a massive dragon statue.</td></tr><tr><td>Felbat</td><td>23</td><td>Dark (weak to Dragon)</td><td>(-410, -55) in a dungeon surrounded by small stone pillars.</td></tr><tr><td>Fenglope</td><td>25</td><td>Neutral (weak to Dark)</td><td>(-245, -433) located in a cave behind a waterfall.</td></tr><tr><td>Petallia</td><td>28</td><td>Grass (weak to Fire)</td><td>(-20, -265) in a dungeon in the center of the Ancient Ritual Site area.</td></tr><tr><td>Beakon</td><td>29</td><td>Electric (weak to Ground)</td><td>(-345, -255) under a strange dome-like stone structure.</td></tr><tr><td>Warsect</td><td>30</td><td>Ground/Grass (weak to Fire)</td><td>(162, -224) in a dungeon near water and large rock pillars.</td></tr><tr><td>Elphidran</td><td>30</td><td>Dragon (weak to Ice)</td><td>(44, -284) on a flat, sandy plateau.</td></tr><tr><td>Boncherry Aqua</td><td>30</td><td>Grass/Water (weak to Electric)</td><td>(-141, -440) at the end of a deep cave near the water.</td></tr><tr><td>Univolt</td><td>31</td><td>Electric (weak to Ground)</td><td>(-117, -543) walking around the edge of a large cliff.</td></tr><tr><td>Relaxaurus Lux</td><td>31</td><td>Dragon/Electric (weak to Ice and Ground)</td><td>(-203, -347) within a dungeon surrounded by small stone pillars and trees.</td></tr><tr><td>Elizabee</td><td>31</td><td>Grass (weak to Fire)</td><td>(36, -190) found within a cave in the side of a cliff.</td></tr><tr><td>Mossanda Lux</td><td>31</td><td>Electric (weak to Ground)</td><td>(450, -183) near a naturally formed stone bridge between two plateaus.</td></tr><tr><td>Lunaris</td><td>32</td><td>Neutral (weak to Dark)</td><td>(-146, -660) in a dungeon on the edge of a cliff overlooking massive flatlands.</td></tr><tr><td>Verdash</td><td>35</td><td>Grass (weak to Fire)</td><td>(285, 8) in a dungeon just south of the Sealed Realm of the Swift fast travel statue.</td></tr><tr><td>Mammorest</td><td>38</td><td>Grass (weak to Fire)</td><td>(190, -478) in the forests in the Plateau of Beginnings.</td></tr><tr><td>Wumpo Botan</td><td>38</td><td>Grass (weak to Fire)</td><td>(450, -51) along the edge of a beach, walking near palm trees.</td></tr><tr><td>Vaelet</td><td>38</td><td>Grass (weak to Fire)</td><td>(130, -52) in a dungeon surrounded by shallow water.</td></tr><tr><td>Sibelyx</td><td>40</td><td>Ice (weak to Fire)</td><td>(253, 69) in a dungeon near a large four-legged statue. Bring cold-resistant armor.</td></tr><tr><td>Menasting</td><td>44</td><td>Dark/Ground (weak to Dragon and Grass)</td><td>(492, 79) at the end of a desert cave. Bring heat-resistant armor.</td></tr><tr><td>Suzaku</td><td>45</td><td>Fire (weak to Water)</td><td>(404, 255) flying over the desert sands. Bring heat-resistant armor.</td></tr><tr><td>Jormuntide</td><td>45</td><td>Dragon/Water (weak to Ice and Electric)</td><td>(-175,-265) and (350, -85) within massive lakes.</td></tr><tr><td>Ice Kingpaca</td><td>46</td><td>Ice (weak to Fire)</td><td>(-255, 478) at the end of an icy mineshaft. Bring cold-resistant armor.</td></tr><tr><td>Anubis</td><td>47</td><td>Ground (weak to Grass)</td><td>(-133, -96) in a small desert near a statue of the Pal. Bring heat-resistant armor.</td></tr><tr><td>Dinossom Lux</td><td>47</td><td>Electric/Dragon (weak to Ground and Ice)</td><td>(350, 570) in a desert cave. Bring heat-resistant armor.</td></tr><tr><td>Astegon</td><td>48</td><td>Dragon/Dark (weak to Ice)</td><td>(-570, -416) in destroyed mineshaft near a body of lava. Bring heat-resistant armor.</td></tr><tr><td>Blazamut</td><td>49</td><td>Fire (weak to Water)</td><td>(-435, -532) in another mineshaft accessible from the base of a mountain. Bring heat-resistant armor.</td></tr><tr><td>Lyleen Noct</td><td>49</td><td>Dark (weak to Dragon)</td><td>(-141, 317) in an icy cave next to a large mountain. Bring cold-resistant armor.</td></tr><tr><td>Frostallion</td><td>50</td><td>Ice (weak to Fire)</td><td>(-357, 510) patrolling a frozen lake. Bring cold-resistant armor.</td></tr><tr><td>Jetragon</td><td>50</td><td>Dragon (weak to Ice)</td><td>(-790, -320) near a series of dead trees and sharp volcanic rocks. Bring heat-resistant armor.</td></tr><tr><td>Paladius and Necromus</td><td>50</td><td>Neutral (weak to Dark) and Dark (weak to Dragon)</td><td>(447, 680) in the desert, encountered together. Bring heat-resistant armor.</td></tr></tbody></table></figure>


<hr class="wp-block-separator has-alpha-channel-opacity"/>


<h2 class="wp-block-heading" id="h-all-palworld-boss-tower-locations">All Palworld Boss Tower locations</h2>


<figure class="wp-block-gallery has-nested-images columns-default is-cropped wp-block-gallery-3 is-layout-flex wp-block-gallery-is-layout-flex">
<figure class="wp-block-image size-large"><img data-id="4762" src="http://gamerode.com/wp-content/uploads/2024/02/Palworld-Map-All-regions-locations-and-points-of-interest-Boss-Tower--1024x576.jpg" alt="Palworld Map All Regions Locations And Points Of Interest Boss Tower " class="wp-image-4762"/><figcaption class="wp-element-caption">Image: DotEsports</figcaption></figure>
</figure>


<p>Palworld consists of a vast collection of islands, and it is home to five Towers that symbolize significant battles against bosses. These Towers are strategically placed across the Palworld map, with two located in the Forest biome, and one in each of the Volcano, Snow, and Desert biomes.</p>


<p>When you reach each Tower in Palworld, you will engage in an intense battle with a powerful boss that belongs to one of the many factions found in the game. You have the option to participate in these challenging battles solo or team up with other players from your server. Let&#8217;s take a closer look at what awaits you at each of these locations.</p>


<h3 class="wp-block-heading" id="h-tower-of-the-rayne-syndicate">Tower of the Rayne Syndicate</h3>


<p>Located in the Northwest of the Plateau of Beginnings, The Rayne Syndicate Tower serves as a significant challenge for players. This tower plays a crucial role in completing the tutorial&#8217;s final step, which requires defeating the boss. However, it&#8217;s not as simple as just equipping swords and sticks and hoping for victory. The boss encounter in this tower is designed to teach players the fundamentals of PvE in raids.</p>


<h3 class="wp-block-heading" id="h-tower-of-the-free-pal-alliance">Tower of the Free Pal Alliance</h3>


<p>Situated on the highest point of the central island, you will find the Free Pal Tower. This tower serves as the final boss of the two initial biomes and will challenge your skills in combating both the freezing temperatures and a highly formidable enemy. Simply relying on a Bow and Arrows will not be sufficient this time. It is essential to equip yourself with a Gun or stronger Pals to effectively face the increased difficulty in PvE.</p>


<h3 class="wp-block-heading" id="h-tower-of-the-pidf">Tower of the PIDF</h3>


<p>The PIDF Tower is located in the northeastern part of the Palworld Map, specifically in the Desert Biome. It stands out easily due to the surrounding mountainous terrain and sandy landscape. However, it&#8217;s important not to venture too far north as there are two formidable legendary Pals that can quickly defeat any player who is not adequately leveled up.</p>


<h3 class="wp-block-heading" id="h-tower-of-the-brothers-of-the-eternal-pyre">Tower of the Brothers of the Eternal Pyre</h3>


<p>The tower in the Volcano Biome is easily noticeable as it is located at the highest point next to the Volcano. Climbing to the top is relatively straightforward as long as you have gear that is resistant to heat. Having a reliable flying mount will make reaching the tower easier, but caution must be exercised to avoid getting too close to the lava, as it can result in fatal burns for both yourself and your Pal.</p>


<h3 class="wp-block-heading" id="h-tower-of-the-pal-genetic-research-unit">Tower of the PAL Genetic Research Unit</h3>


<p>Situated atop the chilly mountain in the Snow Biome, similar to the Volcano Biome, lies the ultimate tower that you must seek out. Positioned at the summit of the Snow Biome&#8217;s mountain, this tower is guarded by a formidable boss with a staggering 200,000 HP. To successfully defeat this end-game menace, it is advisable to equip yourself with potent weaponry such as Rocket Launchers and utilize advantageous Pal Gear.</p>


<hr class="wp-block-separator has-alpha-channel-opacity"/>


<h2 class="wp-block-heading" id="h-all-palworld-cave-and-dungeon-locations">All Palworld Cave and Dungeon locations</h2>


<figure class="wp-block-gallery has-nested-images columns-default is-cropped wp-block-gallery-4 is-layout-flex wp-block-gallery-is-layout-flex">
<figure class="wp-block-image size-large"><img data-id="4763" src="http://gamerode.com/wp-content/uploads/2024/02/Palworld-Map-All-regions-locations-and-points-of-interest-Dungeons.webp" alt="Palworld Map All Regions Locations And Points Of Interest Dungeons" class="wp-image-4763"/><figcaption class="wp-element-caption">Image: DotEsports</figcaption></figure>
</figure>


<p>The Palworld map contains more than 80 Dungeons, but they may not always be accessible as each cave appears on a rotation basis. In Palworld, there are dungeons that operate on a time-based system. </p>


<p>Players can enter these dungeons within a specific time frame to gather resources, capture rare Pals, and battle a boss for extra rewards. Once the time is up, the current dungeon closes and a new one is randomly generated with a different boss. </p>


<p>Each dungeon has its own difficulty level, ranging from level 10 to level 40 and beyond. The more challenging dungeons are usually found in late-game regions such as the Volcano and Snow Biomes.</p>


<p>As new Dungeons continue to be found, it is possible that Pocketpair may include additional ones in future updates. Therefore, it is recommended to personally locate and make note of all Palworld Dungeon locations.</p>


<p>Here are all the dungeon types and their locations:</p>


<ul class="wp-block-list">
<li><strong>Hillside Cavern</strong> ;– Windswept Hills</li>


<li><strong>Ravine Grotto</strong> ;– Bamboo Groves</li>


<li><strong>Isolated Island Cavern</strong> ;– Eastern Wild Island, Marsh Island, Ice Wind Island, Sea Breeze Archipelago, Forgotten Island</li>


<li><strong>Mountain Stream Grotto</strong> ;– Moonless Shore, ;Verdant Brook</li>


<li><strong>Sacred Mountain Cavern</strong> ;– ;Astral Mountains</li>


<li><strong>Cavern of the Dunes</strong> ;– Dessicated Desert</li>


<li><strong>Volcanic Cavern</strong> ;– Mount Obsidian</li>
</ul>


<hr class="wp-block-separator has-alpha-channel-opacity"/>


<h2 class="wp-block-heading" id="h-all-palworld-fast-travel-locations">All Palworld fast travel locations</h2>


<figure class="wp-block-gallery has-nested-images columns-default is-cropped wp-block-gallery-5 is-layout-flex wp-block-gallery-is-layout-flex">
<figure class="wp-block-image size-large"><img data-id="4764" src="http://gamerode.com/wp-content/uploads/2024/02/Palworld-Map-All-regions-locations-and-points-of-interest-Fast-Travel.webp" alt="Palworld Map All Regions Locations And Points Of Interest Fast Travel" class="wp-image-4764"/><figcaption class="wp-element-caption">Image: DotEsports</figcaption></figure>
</figure>


<p>The Palworld map is home to over 45 impressive Great Eagle Statues. These statues are not just for decoration but also serve as convenient Fast Travel points. By simply approaching and interacting with a Great Eagle Statue, you can activate it and then use any other statue on the map to teleport to it.</p>


<p>When venturing into unfamiliar territories, you may come across inactive Great Eagle Statues on the Palworld map. Furthermore, if you set up a Palbox as a base, it will also serve as a Fast Travel point, allowing you to conveniently reach any desired resources or strategically plan the location for your second Palworld base. These Fast Travel Locations encompass:</p>


<h3 class="wp-block-heading" id="h-volcano-fast-travel-locations">Volcano Fast Travel Locations</h3>


<ul class="wp-block-list">
<li>Ruined Fortress City</li>


<li>Mount Obsidian Midpoint</li>


<li>Foot of the Volcano</li>


<li>Eternal Pyre Tower Entrance</li>


<li>Beach of Everlasting Summer</li>


<li>Mount Obsidian Anubis Statue</li>


<li>Ancient Civilization Ruins</li>


<li>Fishermen’s Point</li>
</ul>


<h3 class="wp-block-heading" id="12-snow-fast-travel-locations">Snow Fast Travel Locations</h3>


<ul class="wp-block-list">
<li>Cold Shore</li>


<li>No Man’s Trail</li>


<li>Ice Weasel Hill</li>


<li>Pristine Snow Field</li>


<li>Unthawable Lake</li>


<li>Land of Absolute Zero</li>


<li>PAL Genetic Research Unit Tower Entrance</li>
</ul>


<h3 class="wp-block-heading" id="13-desert-fast-travel-locations">Desert Fast Travel Locations</h3>


<ul class="wp-block-list">
<li>Sand Dunes Entrance</li>


<li>Duneshelter</li>


<li>Deep Sand Dunes</li>


<li>PIDF Tower Entrance</li>
</ul>


<h3 class="wp-block-heading" id="10-forest-fast-travel-locations">Forest Fast Travel Locations</h3>


<ul class="wp-block-list">
<li>Plateau of Beginnings</li>


<li>Sea Breeze Archipelago Castaway Beach</li>


<li>Sea Breeze Archipelago Church</li>


<li>Small Cove</li>


<li>Grassy Behemoth Hills</li>


<li>Small Settlement</li>


<li>Sealed Realm of the Swordmaster</li>


<li>Ascetic Falls</li>


<li>Ravine Entrance</li>


<li>Sealed Realm of the Thunder Dragon</li>


<li>Investigator’s Fork</li>


<li>Sealed Realm of the Winged Tyrant</li>


<li>Deep Bamboo Thicket</li>


<li>Azurobe Hill</li>


<li>Forgotten Island Church Ruins</li>


<li>Forgotten Island</li>


<li>Ice Wind Island</li>


<li>Rayne Syndicate Tower Entrance</li>


<li>Bridge of the Twin Knights</li>


<li>Sealed Realm of the Frozen Wings</li>


<li>Islandhopper Coast</li>


<li>Ancient Ritual Site</li>


<li>Cinnamoth Forest</li>


<li>Hypocrite HALL</li>


<li>Lake Center</li>


<li>Marsh Island</li>


<li>Marsh Island Church Ruins</li>


<li>Natural Bridge</li>


<li>Eastern Wild Island</li>


<li>Mount Floppie Summit</li>


<li>Gobfin’s Turf</li>


<li>Mossanda Forest</li>


<li>Sealed Realm of the Guardian</li>


<li>Snowy Mountain Fork</li>


<li>Sealed Realm of the Swift</li>


<li>Free Pal Alliance Tower Entrance</li>
</ul>


<hr class="wp-block-separator has-alpha-channel-opacity"/>


<h2 class="wp-block-heading" id="h-all-palworld-skill-fruit-tree-locations">All Palworld Skill Fruit Tree locations</h2>


<figure class="wp-block-gallery has-nested-images columns-default is-cropped wp-block-gallery-6 is-layout-flex wp-block-gallery-is-layout-flex">
<figure class="wp-block-image size-large"><img data-id="4765" src="http://gamerode.com/wp-content/uploads/2024/02/Palworld-Map-All-regions-locations-and-points-of-interest-Skill-Tree-1024x576.webp" alt="Palworld Map All Regions Locations And Points Of Interest Skill Tree" class="wp-image-4765"/><figcaption class="wp-element-caption">Image: DotEsports</figcaption></figure>
</figure>


<p>After obtaining a few Great Eagle Statues in different areas, you can begin searching for Skill Fruit Trees on the Palworld. These unique trees produce fruits that have the ability to unlock special Skills for your Pals.</p>


<p>The Skill Fruit Trees in Palworld have the ability to grow fruits for every Pal Element. These fruits can be used to teach Active Skills to any Pal, regardless of their Element. This means that you can teach a Fire Skill to an Ice Pal by using the fruit correctly. </p>


<p>It&#8217;s worth mentioning that Skill Fruits are not related to Passive Skills, which provide stat or behavior modifications to each Pal or Pal Partner Abilities.</p>


<p>To find them, look in distinct areas like the top of large hills or within deep ravines. Make sure to mark all their locations on your ;Palworld ;map for later, too, as Skill Fruit does grow back over time.</p>


<figure class="wp-block-image size-full is-resized"><img src="http://gamerode.com/wp-content/uploads/2024/02/Skill-tree-map-Palworld.webp" alt="Skill Tree Map Palworld" class="wp-image-4701" style="width:770px;height:auto"/><figcaption class="wp-element-caption">Image: DotEsports</figcaption></figure>


<hr class="wp-block-separator has-alpha-channel-opacity"/>


<h2 class="wp-block-heading" id="h-all-palworld-level-zones">All Palworld level zones</h2>


<figure class="wp-block-gallery has-nested-images columns-default is-cropped wp-block-gallery-7 is-layout-flex wp-block-gallery-is-layout-flex">
<figure class="wp-block-image size-large"><img data-id="4766" src="http://gamerode.com/wp-content/uploads/2024/02/Palworld-Map-All-regions-locations-and-points-of-interest-Level-Zone-1024x576.webp" alt="Palworld Map All Regions Locations And Points Of Interest Level Zone" class="wp-image-4766"/><figcaption class="wp-element-caption">Image: DotEsports</figcaption></figure>
</figure>


<p>When you navigate through the Palworld map, you will encounter different biomes and level zones. These level zones contain enemies with different levels of strength. This means that certain areas in Palworld are safer for characters with lower levels, while others present a more challenging experience.</p>


<p>Players in Palworld are not restricted from entering any zone based on their level. From the very beginning, you have the freedom to explore any area of the Palworld map. However, it is important to note that surviving in an extremely hostile environment may prove to be challenging. </p>


<p>We provide a map of Palworld&#8217;s level zones to assist you in navigating Palpagos. Additionally, we offer a detailed breakdown of the recommended player levels for each region, ensuring that you are well-prepared for your adventures.</p>


<hr class="wp-block-separator has-alpha-channel-opacity"/>


<h2 class="wp-block-heading" id="h-palworld-black-marketeer-locations">Palworld Black Marketeer locations</h2>


<figure class="wp-block-gallery has-nested-images columns-default is-cropped wp-block-gallery-8 is-layout-flex wp-block-gallery-is-layout-flex">
<figure class="wp-block-image size-large"><img data-id="4769" src="http://gamerode.com/wp-content/uploads/2024/02/Palworld-Map-All-regions-locations-and-points-of-interest-Black-Marketer-1024x576.jpg" alt="Palworld Map All Regions Locations And Points Of Interest Black Marketer" class="wp-image-4769"/><figcaption class="wp-element-caption">Image: Google</figcaption></figure>
</figure>


<p>On Palpagos Island, there exists a form of trade known as the Black Marketeers, which involves exchanging unwanted Pals for Palworld gold coins. These traders can be found in various locations on the Palworld map, so it&#8217;s not uncommon for them to relocate by the time you revisit a certain spot.</p>


<p>Here are all the main Black Marketeer locations:</p>


<ul class="wp-block-list">
<li>Small Settlement</li>


<li>Desolate Church</li>


<li>Small Cove</li>


<li>Sealed Realm of the Frozen Wings</li>


<li>Sealed Realm of the Winged Tyrant</li>


<li>Sealed Realm of the Swift</li>


<li>Mount Flopie Summit</li>


<li>Marsh Island Church Ruins</li>


<li>Forgotten Island Church Ruins</li>


<li>Eastern Wild Island</li>


<li>Fisherman’s Point</li>


<li>Ruined Fortress City</li>


<li>Beach of Everlasting Summer</li>


<li>Dune Shelter</li>


<li>PIDF Tower Entrance</li>


<li>Icy Weasel Hill<a href="https://www.pcgamesn.com/wp-content/sites/pcgamesn/2024/01/palworld-map-captured-pal-locations-1.jpg" target="_blank" rel="noreferrer noopener"></a></li>
</ul>


<hr class="wp-block-separator has-alpha-channel-opacity"/>


<h2 class="wp-block-heading" id="h-palworld-wandering-merchant-locations">Palworld Wandering Merchant locations</h2>


<figure class="wp-block-gallery has-nested-images columns-default is-cropped wp-block-gallery-9 is-layout-flex wp-block-gallery-is-layout-flex">
<figure class="wp-block-image size-large"><img data-id="4768" src="http://gamerode.com/wp-content/uploads/2024/02/Palworld-Map-All-regions-locations-and-points-of-interest-1.webp" alt="Palworld Map All Regions Locations And Points Of Interest 1" class="wp-image-4768"/><figcaption class="wp-element-caption">Image: IGN</figcaption></figure>
</figure>


<p>If you are in urgent need of resources like Palworld Wheat Seeds, schematics, or Palworld medical supplies, the Wandering Merchant is the place you should visit first. You can usually find them in settlements or close to the ruined churches scattered across the Palworld map.</p>


<p>Here are all the main Wandering Merchant locations:</p>


<ul class="wp-block-list">
<li>Small Settlement</li>


<li>Marsh Island Church Ruins</li>


<li>Forgotten Island Church Ruins</li>


<li>Small Cove</li>


<li>Deep Bamboo Thicket</li>


<li>Dune Shelter</li>


<li>Twilight Dunes</li>


<li>Fisherman’s Point</li>
</ul>


<hr class="wp-block-separator has-alpha-channel-opacity"/>


<h2 class="wp-block-heading" id="h-palworld-captured-pal-locations">Palworld captured Pal locations</h2>


<figure class="wp-block-gallery has-nested-images columns-default is-cropped wp-block-gallery-10 is-layout-flex wp-block-gallery-is-layout-flex">
<figure class="wp-block-image size-large"><img data-id="4767" src="http://gamerode.com/wp-content/uploads/2024/02/Palworld-Map-All-regions-locations-and-points-of-interest-1024x576.webp" alt="Palworld Map All Regions Locations And Points Of Interest" class="wp-image-4767"/><figcaption class="wp-element-caption">Image: GameLeap</figcaption></figure>
</figure>


<p>If you want to rescue all the captured Pals in Palpagos Island, you should be ready to face some battles as they are usually found in enemy camps. </p>


<p>The interesting thing is that these captured Pals are not typically from the same area where they are found, so you have the opportunity to acquire new Pals without having to go to high-level areas. </p>


<p>To free them effortlessly, make sure to bring the best weapons in Palworld. You can find the exact locations of the captured Pals in the Palworld Map.</p>


<hr class="wp-block-separator has-alpha-channel-opacity"/>


<p>For more content on ;<strong>Palworld</strong>, check out the relevant links below and any of our guides, list of games, and news on ;<a href="https://gamerode.com/">Gamerode</a>.</p>

Palworld Map: All regions, locations, and points of interest